Baked ham, a staple at Christmas, is a simple but tasty dish that even the most novice cook can master in short order.
How you bake a ham will vary depending on whether it is fresh or preserved and whether or not it has been pre-cooked, but regardless of which type of ham you use, the method will be very straightforward. You can also vary the flavour of your ham by playing around with different glazes, some of which can be found in our ham glazes information sheet. Speak with our Deli department today on 07 3357 5433 or email us at
What ham size to choose?
1. Bone-in ham 200 – 250g per person 6 people = 1.5 – 1.8kg ham
2. Boneless ham 150 – 200g per person 6 people = 1.2 – 1.5kg ham
Buy a pre-cooked ham. You can buy hams with the bone-in or the bone removed. Bone-in hams are slightly more flavourful and make a dramatic dinner table centerpiece for any special occasions. They can be a little harder to cut than hams with the bone removed.
Use the guide above to determine which size ham you will need. Our friendly butchers will be happy to help you choose a ham.
The bone with little bits of meat on it can be reused to flavour and add bits of texture to a soup, but it has little substance and value compared to the same quantity of solid meat.
Storing and thawing your ham
Ham must be stored properly to prevent the growth of bacteria on the ham. You can keep your ham in the refrigerator at a temperature of 4ºC or lower. Boneless ham can be stored in the refrigerator at this temperature for up to a week, while bone-in hams (such as the rump or shank portions) will keep for up to two weeks.
If you are buying your ham well in advance of the date you intend to cook it, your best option would be to freeze it, making sure it is well-wrapped or vacuum packed. Uncooked ham will keep for up to 6 months in the freezer, while cooked ham will keep for two, before the freezing begins to affect the flavour and quality of the meat.
Once you decide to thaw your meat, be sure to do so in a safe, correct manner. Ham should never be thawed at room temperature, on your kitchen counter-top, as the outer layers of meat will defrost and become a breeding ground for bacteria, while the center remains frozen.
To thaw frozen ham correctly, you can either place the ham on a dish in the refrigerator to thaw the ham slowly (4-7 hours depending on the size of the roast) or place the bag in a water-tight bag and submerge it in cold water for a faster defrost (approximately 30 minutes per 500 grams of meat).
Preparing your ham
Remove and discard any packaging from the ham. If the ham is precooked in a factory-sealed pouch, retain the flavourful liquid for basting and/or dressing: cut open the big side of the package facing up, lift out the ham, and pour out the liquid into a container. Set it aside in a refrigerator. Because it has sat in meat for days, it is best to heat it to cooking temperature before consuming.
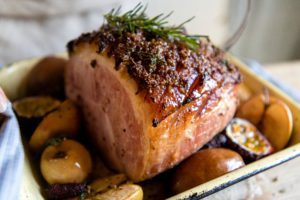
Place the ham – fatty side up – on a chopping board. Score with a sharp knife, making a diamond pattern. The slices should be about 6mm to 12mm deep, with each parallel line 3.8 cm apart.
You should not cut into the meat itself when scoring, just into the layers of skin and fat. This will allow the flavours from the glazing to seep into the meat, while also producing a decorative effect.
Traditionally, a clove is inserted into the centre of each diamond for flavour and decoration. Just make sure to remove the cloves before eating because they are hard and strongly flavoured. If you find the clove too strong, you can use bits of dried fig instead (these will caramelize deliciously onto the ham during baking). You can also dust on ground spices. With clove, a little goes a long way!
Some people prefer to trim away the extra layers of fat and skin before cooking the ham, but this is not necessary and roasted fat can add mouth-feel, flavour and appearance and reduce drying of the meat within. So better to leave the normal thin covering of fat.
Place the ham in a roasting pan. Line the pan with aluminium foil first, as this will make the clean-up easier, as well as helping to catch any juice from the meat. Place the ham fat side up and leave uncovered. The fat from the top of the meat will melt and run down the sides of the ham, helping to baste it in the process.
Some chefs recommend adding half a cup of white wine to the base of the pan before baking, to prevent the ham from sticking. You can also use water or juice if you don’t want to use wine.
Glazing your ham
There are an endless amount of homemade glaze recipes out there – which one you choose depends on your personal preferences – whether you like your ham sweet and succulent or herby and slightly spiced! Some simple, yet delicious suggestions are outlined in our ham glazes information sheet. The key ingredient is sugar, which can caramelize to a crunch. Heat, such as a microwave’s, will help mix it up with less water (careful!). A little corn syrup or honey can prevent excess crystallization; too much can make it gooey. To keep the glaze from running off under heat before it binds to the surface, add a teaspoon or so per cup of corn syrup, mixing it in cold, and finishing dissolution to a clear gel warm.
Regardless of which glaze you choose to use, separate a third of it and set the rest aside for now. Use a pastry brush to apply the glaze to the top of the ham, making sure to work the glaze in between the scored lines.
You will keep the ham moist during cooking by continually brushing the meat with the reserved glaze at 20 minute intervals. In this way, all of the glaze should be used up by the end of the cooking time.
Be wary with sugar-based glazes as the sugar may start to burn on the surface of the ham before the ham is fully cooked. Keep a close eye on the color – if it starts to turn dark brown or black, make a “tent” from aluminium foil to cover the ham while it finishes cooking.
Alternatively, just heat the ham wrapped up and brown and glaze it at the end.
Baking your ham
Preheat the oven. Set the temperature to 180ºC if using a conventional electric or gas oven. Set to 170ºC if using a convection oven.
Place the ham in the preheated oven for baking. The amount of cooking time will depend on the size of the ham and whether it has been pre-cooked or not. Follow the guidelines below for cooking times:
Bake a partially or fully-cooked preserved ham for 10 minutes per 500g to reheat the ham completely through.
Baste the ham every 20 minutes. To add moisture and flavour to the ham, open the open door and baste the meat with additional glaze, along with any juices that have escaped.
Test the internal temperature of the ham. You can do this by inserting a meat thermometer into the ham which stays there during cooking, or by using an instant read thermometer once the ham is cooked. When the thermometer 71ºC, the ham is done.
When using a thermometer to test the temperature of a bone-in ham, make sure that the thermometer is not touching the bone, as this will affect the reading and give an inaccurate result.
Note that if a ham has been fully pre-cooked, it is okay to remove the meat from the oven once it reaches a lower temperature of between 43º to 50ºC, as you are simply reheating it for eating.
Baste the meat in its juices, cover and leave to rest, covered in aluminium foil, for at least 15 minutes before carving. This will allow the ham to finish cooking, while also letting the meat settle, making it easier to carve. (Do not pour pan drippings over the outside of a sugar glazed ham. They won’t get in and will tend to wash off the glaze.)
Serving your ham
Once the ham has finished resting, you can carve the ham, typically perpendicular to the bone, using a long sharp knife. If it’s a bone-in ham, you should first cut around the bone to loosen the meat, then slice it thinly.
Thin slices are best, to expose more tasty surface area and not emphasize ham’s unusually dense texture.
Alternatively, you can rest the meat on its side and cut a slice off the wide end to make a flat surface. Turn the ham so that it’s sitting on this flat end and then cut long, thin slices down the length of the ham.
Make sure to save the bone, which you can use to add great flavour to soups. If you won’t use it immediately, wrap it in plastic to reduce desiccation.
Place the ham on a serving plate and bring to the table for your guests to admire. Make sure to keep the leftovers for use in sandwiches, quiches, casseroles or whatever you like!
Leftover ham slices are tasty and different grilled, like thick-cut, low-fat bacon. Takes just a minute with a skillet before adding to cool lettuce, tomato, mustard, mayonnaise or other sandwich fixings or breakfast! Caramelization of a little sweet mixture added between spiral slices can make this even more delicious. Also a great way for initial serving to those who fundamentally dislike basic ham.